Many Celtic deities seem to have been associated with aspects of nature and worshipped in sacred groves. Some appear in Read more
Guide to Framing the Shot: Capturing Archaeological Sites with Precision
When photographing archaeological sites, the key to a successful shot lies not just in the technology you use but in how you frame the scene, manage lighting, and anticipate the environment. The art of capturing the best possible image is a blend of technical understanding and creative intuition. In this section, we’ll explore key concepts of framing, timing, and technique to help you enhance your shots, improve evidence collection, and document sites with precision.
Timing and Lighting: The Foundation of a Great Shot
Timing is everything—in both archaeology and photography. The natural light available at different times of day can drastically affect the quality of your shots, especially when photographing features like Earthworks, ruins, and subtle topographical features. Understanding when and how to take advantage of these lighting conditions is essential.
Golden Hour and Shadows:
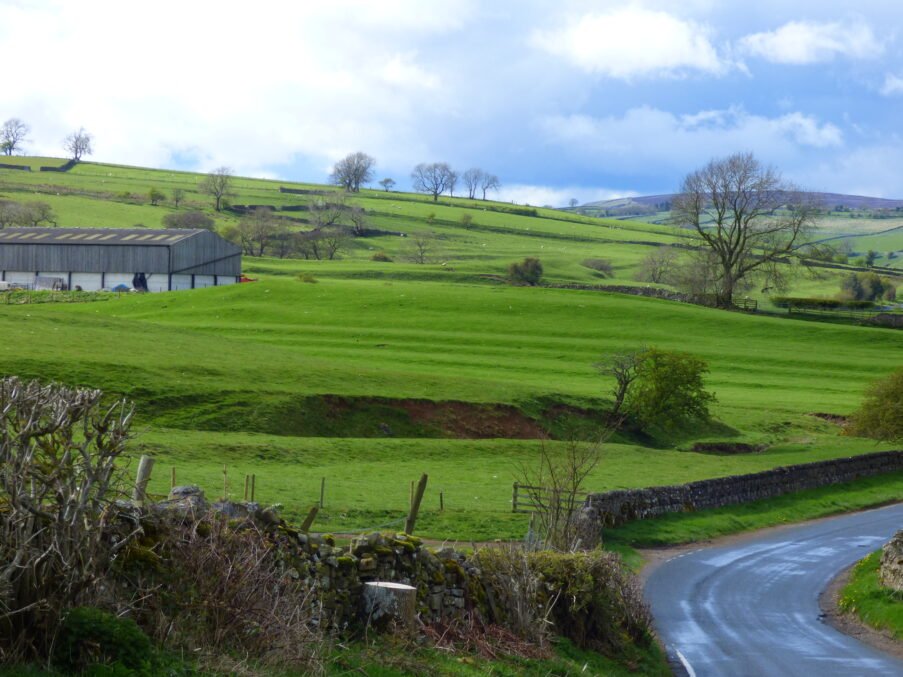
In winter months, many of the Yorkshire Dales are in shadow for much of the day due to the surrounding hills and valleys. Early mornings offer the best opportunity to capture long shadows and rich light. This is known as the “golden hour,” the time shortly after sunrise and just before sunset when the sunlight is softer, creating long, dramatic shadows and adding depth to the landscape.
Long shadows can help define earthworks, such as ditches, mounds, and embankments, making them more visible and enhancing the texture of the landscape. These features are often subtle and may be almost invisible when taken in flat midday light.
Winter Light:
During winter, low sunlight can cast dramatic shadows, adding depth and definition to the landscape. On the other hand, overcast days can provide soft, diffused light, which reduces harsh shadows and can be useful for capturing finer details without strong contrasts.
For earthworks and subtle features, lighting angles are key. Shadows highlight topographical changes, making it easier to see buried walls or structures. If you shoot these features at the wrong time of day or year, they may appear completely flat and indistinct.
Pay Attention to Weather:
Windy conditions can cause blur in your photos, especially when you’re shooting with longer exposure times or using lightweight equipment. A tripod is essential for stable shots, particularly when the wind is strong. Use a remote shutter or self-timer to avoid shaking the camera during the shot.
The atmosphere itself can contribute to mood and clarity. Mist, rain, or even bright sunlight filtering through clouds can add to the drama of the scene, especially in landscape shots.
Lenses and Techniques to Enhance Your Shots
Different lenses and techniques can dramatically affect how you capture and interpret archaeological sites. The right lens for the job is essential, as each lens brings unique strengths to different types of shots.
Wide-Angle Lens:
Best for: Capturing large sites, expansive landscapes, or sweeping views of earthworks. The wide-angle lens allows you to include both the site and its surrounding landscape in a single frame, providing context and depth.
How it Enhances Evidence Collection: When photographing large or open spaces, a wide-angle lens ensures you capture the full scale of the site and its features. It’s particularly useful when trying to show the relationships between various parts of the site, such as pathways, structures, and natural features.
Standard Lens (50mm or equivalent):
Best for: General-purpose shots of smaller sites, artifacts, or features that require more natural perspective. It’s often referred to as a “nifty fifty” for its versatility and sharpness.
How it Enhances Evidence Collection: This lens is great for photographing small, detailed features, or when you need a natural, undistorted view of the subject. It’s ideal for capturing objects in situ (in their original location), whether it’s pottery fragments or the delicate edges of a wall.
Macro Lens:
Best for: Close-up photography of artifacts or intricate details of objects and features. The macro lens allows you to focus on fine details without distortion.
How it Enhances Evidence Collection: It’s invaluable for photographing small finds or detailed features like inscriptions, carvings, or pottery shards, providing sharp, high-resolution images.
Telephoto Lens:
Best for: Capturing distant features, such as wide shots of a site from afar or high-altitude shots. A telephoto lens lets you zoom in on specific parts of a site without disturbing the surrounding area.
How it Enhances Evidence Collection: This lens is excellent for large-scale site surveys, especially when photographing features from a distance, like earthworks, boundary lines, or distant settlements. It can also be helpful for shots taken from surrounding peaks or high ground, offering an overview of the site’s relationship with the surrounding landscape.
Basic Techniques for Framing the Shot
Rule of Thirds:
One of the most basic principles in photography is the rule of thirds, where you divide your frame into three equal horizontal and vertical sections. This creates a grid that helps you place key features of the site or object at intersections or along the lines, drawing the viewer’s eye to important elements naturally.
Use of Leading Lines:
Leading lines are natural or man-made lines that guide the viewer’s eye through the image. Paths, roads, walls, and rivers all create lines that can draw attention to a specific point of interest or lead the viewer deeper into the scene. In archaeology, these lines often show how a site was structured or planned, revealing the site’s relationship to its surroundings.
Framing the Feature:
When capturing specific features, especially delicate ones like inscriptions or pottery, focus on creating a clean, uncluttered shot that highlights the feature. Use natural framing—such as doorways, windows, or gaps in the landscape—to draw attention to the object or feature. This helps keep the viewer’s focus on what matters.
Scale and Perspective:
Including scale in your shot can be crucial for understanding the size and context of a feature. Whether it’s a person standing next to a wall, or a measuring tool laid next to an artifact, showing scale helps to give your audience a better understanding of the size and significance of the find.
Practical Considerations for Field Photography
Tripods and Stability:
Always use a tripod for stable shots, especially in low light or with longer exposure times. Even slight movements can blur the image, so keeping your camera steady is essential, particularly when capturing detailed shots of artifacts or subtle features.
Battery and Memory Management:
Spare batteries and memory cards are essential for fieldwork. Field conditions can drain your camera’s battery quickly, and you don’t want to run out of storage space during an important moment. Keep extra batteries and memory cards in waterproof cases to protect them from the elements.
Quick Shots with Your Phone:
Smartphones can be invaluable for taking quick shots or documenting finds on the go. While they may not replace a high-end DSLR, modern smartphones can produce surprisingly good images, especially when you need to document a feature quickly or when you’re unable to carry your primary camera.
Weather and Equipment Care:
In windy weather, ensure that your camera is securely placed on a stable tripod and use weights or anchors if needed. Keep an eye on your equipment to ensure it’s protected from dust, rain, or extreme conditions. Waterproof camera bags and covers are essential for protecting your gear when working outdoors in less-than-ideal conditions.
Conclusion
Framing the perfect shot requires a balance of technical understanding and creative intuition. By paying attention to timing, using the right lenses, and incorporating field considerations, you can capture the most accurate and meaningful images for archaeological documentation. Whether you’re photographing a subtle Earthwork or a large settlement, the right technique will allow you to capture the story of the site and the evidence that will bring its history to life.
The next step is learning how to choose the best camera for the job, which we will cover in the next section. But for now, remember that photography is not just about capturing a moment—it’s about documenting and preserving the rich, layered history that these sites hold.
Fragment of a copper alloy drilled buckle frame with a separate spindle, which is now missing, c. 1760-1790AD.Measurements: Length: 44.2mm; Width: 10.7mm; Thickness: 6.0mm; Weight: 3.64g [...]
A probable copper alloy Roman stylus dating to c.AD 43-410.The object comprises a shaft which is circular in cross section. At one end the shaft narrows to a pointed terminal. At the other, the shaft [...]
Everted and thickned rim sherd of a medieval to post-medieval cast copper alloy cooking vessel in quite fresh condition but with old breaks. There are slight traces of sooting on the exterior. The diameter is [...]
Five small fragments of fired clay, reduced with oxidised margins and surfaces, profuse chalk inclusions, and on two larger pieces withy impressions on smoothed surfaces. Weight 56g. Daub from stud walling or from a hearth or kiln [...]
A fragmentary and incomplete Roman silver Radiate of Gallienus, dating to c. AD 258-259 (Reece period 13). GERMANICVS MAX V reverse or similar depicting a trophy between two captives. Possibly mint of Lugdunum. Cf. RIC V Gallienus [...]
An extremely corroded Roman copper alloy Sestertius of uncertain 1st or 2nd century ruler. Uncertain reverse type depicting a standing figure. Probably mint of Rome. [...]
An incomplete uninscribed Iron Age silver unit of the Southern Region, probably of the East Wiltshire group and dating to c. 50-20 BC. Obverse: unclear, possibly a moon head, right. Reverse: Annulate horse, left. [...]
Thirteen sherds of medieval to post-medieval Late Medieval and Transitional pottery (Jennings 1981, 61-2), all body apart from 2 pancheon rim and 2 basal, weight 128g, mid 15th - 16th century. [...]
Two hundred and eighteen sherds of medieval pottery, body unless otherwise stated, weight 1.212kg, 12th - 15th century:- 216 unglazed including sixteen everted jar rim (cf. Jennings 1981 fig. 14 nos. 285-92), twenty-one bowl and [...]
A small oval tertiary flake of pale brown flint, probably of Neolithic date. The left lateral side has been refined with semi abrupt retouch struck from the dorsal side and there is a small amount [...]
A copper alloy fragment, probably from one end of a purse bar of late Medieval to early post Medieval date (cf. Williams Class C). The arm has a rounded cross section, 4.8mm in diameter and ends [...]
An incomplete medieval cast copper alloy oval buckle, with an expanded and thickened front edge. Any decoration has been lost to corrosion. The strap bar has small lobes at either end, but has broken away [...]
A complete copper alloy seal matrix of Medieval date (c. AD 1250-1300).The matrix is flat and pointed-oval or vesica-shaped. On the reverse is a central rib with a perforated lug at the top of the seal. The front [...]
Copper alloy jetton. Hammered French jetton, Late Medieval issue of 1350-1400Obverse description: box-like structure of bars ending on annulets – probably Chatel Tournois.Obverse inscription: [---]*E[-]I[-]SVReverse description: long cross, with short bars at ends of arms [...]
An Iron Age gold quarter stater of the East Wiltshire region, dating to c. 50-35 BC. Savernake Wheel type. Obverse: wreath, crescents below, pelleted spike. Reverse: horse, wheel below, solar spiral above. As ABC p.107, no.2101; BMC 546. [...]
An incomplete copper-alloy imitation of a Roman radiate, probably of Tetricus I (AD 271-274) or Tetricus II (AD 272-274) dating to the period c.AD 275-285 (Reece Period 14). Probably PIETAS AVGG / AVGVSTOR reverse type depicting sacrificial instruments. Unclear [...]
An incomplete silver Penny of James I (AD 1603-1625). First Coinage. Squared shield. Thistle or Lis initial mark. AD 1603-1605.Diameter: 13.44mm, Thickness: 0.38mm, Weight: 0.28gThe coin is missing minor portions of its outer flan.North Vol II, P 144, [...]
An incomplete silver Threepence of Elizabeth I (AD 1558-1603). Second coinage. Long cross fourchée over squared shield reverse, with date above. Sword initial mark. AD 1582.Diameter: 18.64mm, Thickness: 0.68mm, Weight: 1.41gThe coin is missing portions of its outer [...]
An incomplete copper alloy nummus of the House of Constantine dating to the period AD 354-361. Reece period 18. Probably SPES REIPVBLICE reverse type depicting the emperor standing left, holding globe and spear. Unclear mint.Diameter: 13.62mm, Weight: [...]


")


